The Karma Project: Code Less, Teach More

June 21, 2010

Karma Project Merging with TinyGames

Filed under: News — bryanwb @ 7:53 am

As I recently announced on the Karma mailing list, I am closing the karmajs group and folding it into the tinygames google group. I am very excited about tinygames and hope to see it fulfill the goals of karma. Closing the google group is part of the process of merging the Karma project with tinygames.

For those of you not familiar with tinygames, it is an open-source initiative that aims to create a pool of simple educational lessons that 1) can run in the browser 2) align with curriculum objectives and 3) are addictively fun. Not only does tinygames have the right mission but it has the right person leading it. Greg DeKoenigsberg, former Fedora community honcho, has tons of experience guiding online communities to create great free software. I feel confident that he will do so again.

So please take the time to join the tinygames google group and hang out at #tinygames on irc.freenode.net whenever possible.

Regards,

Bryan Berry

April 28, 2010

Karma Project Update

Filed under: News — bryanwb @ 7:26 am

I apologize for the lack of activity on the karma.js mailing list and on this blog. While this blog has been silent, development has been proceeding steadily. Please check out the current set of Karma lessons here. The finished lessons are in folders ending with the “_K” suffix. The biggest change in Karma-land is that I have had to significantly reduce my personal involvement in the Karma Project and larger OLPC Movement for the foreseeable future.

Changing of the Guard

I have been working in the OLPC Movement for four years now, the last three as a full-time volunteer. I have had the pleasure of working with some incredibly talented people scattered around the world. Real life, unfortunately, is interfering with my ability to continue working on Karma full-time. I am leaving Nepal this summer to move to Rome, Italy with my fiancee, Kimberly. Once there, I will do my very best to secure paying employment. If you know anyone looking for a good linux sysadmin/web developer to work in Rome or remotely, please don’t hesitate to contact me. Preparing for the RHCE exam over the last two months has consumed much of the time I would normally spend on Karma.

I am very happy to tell you that a more than capable replacement is waiting in the wings. Peter Gijsels, an incredibly-talented Belgian software engineer, will take over technical leadership of Karma in early June. Peter is relocating from Leuven, Belgium to lovely Kathmandu to focus full-time on Karma and work very closely with Nepal’s content development team.

Exploding Interest in HTML5

I have received a large number of e-mails expressing interest in Karma’s progress over the last two months. I find this ironic since I have been least active in the project during this same period. I correlate this to the fact that HTML 5 is rapidly developing as application platform. With ipad’s exclusion of Adobe Flash (and other cross-platform toolkits) and Flash’s poor run-time performance on many current Android devices, many developers are looking to HTML5 as the only toolkit that runs on the new crop consumer technology devices. The rapid growth of SVG toolkits like Raphaeljs doesn’t hurt either.

Next Steps

The single piece of Karma that needs the most work is integration with pootle. Peter and I made some decent progress on this front in February and March, but have stalled since then. I suspect that completing this component will be at the top of Peter’s to-do list.

Important Notice:

The Karma development tree has moved from http://git.sugarlabs.org  to http://git.olenepal.org. OLE Nepal had to set up its own git repository because of bandwidth issues. Doing periodic builds for E-Paath requires downloading the entire Karma tree anew from the git repository. This can take days across our crappy Internet connection. With our locally hosted git server, this process only takes a few minutes. Our local repository is completely public and I hope to find time in the near future to replicate it to a read-only repository hosted at git.sugarlabs.org.

February 18, 2010

Introducing the Karma Lesson Template

Filed under: News — Tags: , , , , , , , , — bryanwb @ 8:19 am

I have created a simple template for individual karma lessons. In this post, I will explain how to use the template and what still needs to be implemented. The template still has some rough spots that I would very much appreciate feedback on.

Before reading on, you should download the lesson template directly or use git to clone the repository.

$ git clone git://git.sugarlabs.org/karma-lesson/mainline.git

What the Template Provides

  • Layout that matches the XO’s screen resolution
  • Navigation bar – with links to help text, lesson plan, and teacher’s note
  • Viewer for lesson plan and teacher’s note
  • Scoreboard, timer, Start, Stop, Restart buttons all in the footer
  • Helpers to make your lesson event-driven rather than using a single control loop
  • Basic i18n for strings, but this is still in flux

Most Important Files in the Template

These are the files that will modify to create your lesson

  • index.html – the markup for your lesson
  • js/lesson.js – the code for your lesson
  • css/lesson.css – the layout for your lesson

Meet index.html

index.html

The html markup in index.html is quite simple

<body>
        <div id="kHeader">
        </div>

	<!-- Put the help text inside #kHelp -->
	<div id="kHelp" title="Help Title"> Help text here</div>
	<div id="feedback"></div>
	<!-- #kMain is where the magic happens, the main frame where your lesson
              its stuff -->
	<div id="kMain">
	  <strong id="itWorks">It Works!</strong>
	</div>
	<div id="kFooter">
	</div>
</body>

That is very little html for actual page that is rendered. That is because #kHeader, #feedback, and kFooter are just scaffolding that we use to hang jQuery UI widgets on.

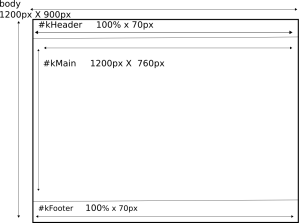
Here is a wireframe of index.html that will help you understand the dimensions and layout

As you can see from the wireframe, the lesson has a default width of 1200px and height of 900px. This gives you 1200px X 760px in #kMain to use for your lesson.

This is to match the dimensions of the XO. We could default to a smaller resolution that matches most desktops, like 1024 x 760 or 800×600 and scale up the lesson on the XO. We don’t do this for two reasons. First, scaling up is cpu-intensive and slow as molasses on the XO and second, scaled up raster images (.png, .jpg) ‘pixelate’ and look like crap. If we only used SVG images throughout the template, this would be a non-issue, as SVG scales up and down without performance cost.

I have created a function in the Karma.scaleWindow that will scale down the entire lesson to 950px X 760px. This leaves you only 950px X 460px. Please don’t develop a Karma lesson at this resolution if you intend it to run on the XO. I created this function to scale down your lesson to run on non-XO’s with the resolution 1024 x 760. With a bit of work you can make sure your lesson works at both 1200px X 900px. By far the easiest way to do this is to only use SVG.

Karma.scaleWindow();   /*scales window to 1024 x 760 if current browser window is narrower than 1150px */

If anyone has a better idea how to handle different screen resolutions while still accommodating the XO’s performance issues, please let me know.

Additional files that may be of special interest

  • start.html
  • kDoc.html
  • lessonPlan.html
  • teachersNote.html

The start.html page is an introductory page to the lesson that provides big obvious links to the Lesson Plan and Teacher’s Note. It also indicates very clearly which grade and academic subject the lesson is for. The Lesson Plan describes how to lead the children through the lesson in a classroom. The Teacher’s Note explains what the purpose of the lesson is and where it fits into the curriculum. index.html also has quick links to the Lesson Plan and Teacher’s Note but they are harder to find. The start page may seem unnecessary to some, but the teachers in Nepal tell us that they like it.

I have created a simple viewer kDoc.html for viewing the lesson plan and teacher’s note.
I cannot understate the importance of the lesson plan and teacher’s note. Figuring out how to use educational software effectively with 30+ energetic kids is not a trivial task.

Widgets

Remember the minimalist markup for kHeader, kFooter, feedback. All three are jQuery UI widgets that have to be attached to HTML <div> elements.

A jQuery UI widget typically consists of a JavaScript file and a CSS file. Here are the widgets and the files that make them up:

  • kHeader — js/ui.kHeader.js and css/ui.kHeader.css
  • feedback — js/ui.feedback.js and css/ui.feedback.css
  • kFooter — js/ui.kFooter.js and css/ui.kFooter.css

See the API documentation online or at docs/index.html in the template

Attaching a widget to a page

var $kFooter = $('#kFooter').kFooter();  //where #kFooter is a <div> element

Using different initialization parameters

var $kFooter = $('#kFooter').kFooter({'winningScore': 6, timer: true, scoreboard: false,
						pauseButton: true, startButton: true});

Notice that II assigned the result of the kFooter method to the variable $kFooter. This variable is cached reference that I can use to call new methods on the kFooter later and it is much faster than using a fresh jQuery selector each time like $('#kFooter').kFooter(/* some method */);. The naming convention for such variables is to prefix them with the ‘$’ character to signify the variable refers to a jQuery object.

All three widgets have their own methods that you can use to interact with them. The kFooter widget, for example, has methods getScore(), inc(), dec(), setScore(), startTimer(), stopTimer(), and more to manage its built-in scoreboard and timer

Calling methods on jQuery UI widgets is bit different. You pass the method name as an argument in order to call it. Here are examples of calling methods on the kFooter widget:

$('#kFooter').kFooter('inc');   //increments the score
//or if u have a reference
$kFooter.kFooter('inc');

// To pass arguments to the method, simply append them as additional arguments
$kFooter.kFooter('inc', 2);  //increment score by 2 rather than the default of 1

Event-Driven User Interface

When you create your first lesson, it is very tempting to use a loop like

while(true){

  if(/* user does X */){
       exit the loop
  }

}

This code, while well-intentioned will cause your browser to display the horrible “Unresponsive script” message. The code also makes the user interface sluggish and generally unresponsive.

You can avoid this terrible message by making your code event-driven. This is a big word for using events and flags to control the behavior of your lesson.

Here is some code that look event-driven but actually is just a modified for loop and should be avoided. It can also cause the dreaded “Unresponsive script” message.

var timerId;

var game = function(){
      /* do stuff */
      timerId = setTimeout(game, 10);
}

if(/* user wants to quit */){
     clearInterval(timerId);
}

Here is a good example of event-driven code, modified code take from ui.kFooter.js

var timerRunning = true;
var runTimer = function(){
	if (timerRunning) === false){
	    return;  /* setting timerRunning to false stops the timer */
       } 
        /* code for manipulating the time displayed */
				      
	timerId = setTimeout(runTimer, 1000);
};

//start the timer
runTimer();

//to stop the timer, set the flag timerRunning to false
timerRunning = true;

Things to Remember:
* Use setTimeout rather than setInterval
* Set flags to stop a background animation or timer rather than clearInterval()

Triggering custom Events and listening for them

If you initialize the kFooter widget with a winning score, it will emit a custom event “kFooterWinGame” event when that score is reached.

var $kFooter = $('#kFooter').kFooter({'winningScore': 6});

//show congratulations message when kFooterWinGame event is emitted
kFooter.bind('kFooterWinGame', 
		function(){
		    $('#congratulationsMessage').show();
		});

The API documentation details the events that each widget emits.

Unresolved Issues

Here are some unresolved issues that I will continue working on and would most appreciated help with.

  • Scaling – scaling and raster graphics (.png, .jpg files) just don’t play well together
  • Icons – jQuery UI icons are all png’s, which means they scale poorly. They are also too small and hard to override
  • Sound plays poorly on chromium on linux — pls up vote this issue in the chromium bug tracker to encourage the chromium guys to fix it.
  • internationalization — still in flux, doesn’t integrate with pootle
  • Firefox 3.6 performance is pretty sluggish on the XO. We really need to figure out how to get chromium running on the XO. I believe it will be at least 2x faster.

Internationalization is still very much in flux – I have created a basic jQuery plugin for handling it but it leaves much to be desired. I just recently discovered google chrome’s i18n mechanism for chrome extensions and I believe that it is far superior. I hope to port it to jQuery, which should take some time. I really think that chrome, jQuery, and Firefox’s jetpack should agree on a common API for i18n. Integration with pootle will be a pain but there more incentive for others to integrate with it if all three platforms used the same tooling.

January 28, 2010

A Strategy for localizing jQuery UI plugins

Filed under: News — Tags: , , , , — bryanwb @ 4:29 am

This is a repost of this post to the jQuery UI forum
I have to support several locales for the jQuery UI plugins I am creating and am trying to think of a consistent way to support localization of numeral characters and any strings that may be embedded in the plugin. I think the mechanism I have in mind may be useful to the larger jQuery UI set of plugins.

To clarify, this proposal is mean to support localization of numeral characters and strings embedded in a plugin, not dates or currency formats ($ 1.000,00 vs. 1,000.00) but it could conceivable support those as well. If you aren’t already aware, a number of languages like Arabic and Hindi use different numeral characters for 1-9. For example, ४ is 4 in Hindi.

I propose the following methods for localizing strings and numbers

New Functions

$._({String}, [locale])
find translation of string for current locale. In case you have multiple locales loaded, you can pass a different locale from the default one. Say the default the locale is English but you need to interject Nepali. An example of this would be an English Lesson for Nepali children.

$._c({context}, {String}, [locale])
find translation of string for current locale in a given context. In case you have multiple locales loaded, you can pass a different locale from the default one. Say the default the locale is English but you need to interject Nepali. An example of this would be an English Lesson for Nepali children.

$._n({Number}, [locale])
convert the number to specified locale.

While ‘_’ is used to prefix private variables and methods in js, it is the standard shorthand for the GNU gettext() method in a number of languages and frameworks.

Loading Locales

I think locales should be loaded individually for each plugin rather than a big page wide plugin. Also, the locale information should be embedded in the main plugin code. It bulks up the code and different versions of the code for each locale á la datepicker, makes the code harder to maintain.

All the locale info should be in a .json file in the ui.plugin_name.l10n.locale_name.json file

for an example datepicker plugin

ui.datepicker.js
ui.datepicker.css
ui.datepicker.l10n.ne.json //’ne’ for nepal, for country of residence 😉

datepicker.js would then load the json file as $.ui.datepicker.l10n.ne

I recommend using the l10n namespace because otherwise we would conflict with any two-letter property name.

.json localization json files for a site could be consolidated into a single .json file for deployment.

The Problem of Contexts

In English, we often use the same word to mean different things in different contexts. A good example is “right” which can mean a direction and affirmation. Spanish, Nepali, and many other languages do not use the same word for the direction and affirmation.

GNU gettext, the standard bearer for open-source localization, lets you specify contexts for this kind of situation.

_c(context, string, [locale]) could be used

For example, _c(‘map’, ‘right’) for the context of a map and _(‘test’, ‘right’) to fetch the translation in the context of a test on the same page.

I am not exactly sure how to handle contexts, but it is important to consider

Summary

I hope to have a basic prototype of this up and running by the end of the week.

I haven’t explored how to use this mechanism to handle currency and date formats, I think it could easily do so. A harder problem is handling the localization of css, something I haven’t put hard thought into.

Ideas have been liberally borrowed/stolen from

http://www.gnu.org/software/gettext/
http://jsgettext.berlios.de/doc/html/Gettext.html

January 15, 2010

Get Started with Jake, a Rake clone in JavaScript

Filed under: News — Tags: , , , , — bryanwb @ 8:33 am

In my last post, I gave an introduction to narwhal, a standard library for JavaScript. This time I will explore Jake, a Rake clone in JavaScript. I have been using it for the repetitive tasks in the Karma project like generating documentation, cleaning up temporary files, and checking out the latest version and packaging it for deployment. You may want to take a look at my Jakefile before you work through this tutorial.

What Jake doesn’t have

  • XML files
  • Special syntax

Jake only has pure JavaScript. This is a good thing. (mental) Context switching is expensive, particularly for utility scripts you might only look at once every few months.

Why use *-ake?

Managing a software project, especially web development projects, I find myself needing to do a number of repetitive and mind-numbing tasks that often, but not always, need to be done in a certain order. When packaging a new release of Karma, I usually want to check out the latest code from several repositories, put all the files in a temporary directory, remove unnecessary files, minify the source, and copy common JavaScript and CSS files to a common directory. Sometimes, I just want to check out the latest code. Sometimes I just want to minify the source and not move around the JavaScript and CSS files.

Here are the Tasks

  1. Check out files from version control
  2. Copy files to a temporary build/ directory
  3. Copy Common JS and CSS to a common directory, change references to new paths
  4. Remove files not needed for deployment to the server like docs, tests, utilities
  5. Minify JS and CSS files
  6. Optionally, compress project files into a tarball or zip file

Here is how those same tasks map to Jake tasks

  1. Check out files from version control ==> jake checkout
  2. Copy files to a temporary build/ directory  ==> jake build-dir
  3. Copy Common JS and CSS to a common directory, change references to new paths  ==>jake move-common-files
  4. Remove files not needed for deployment to the server like docs, tests, utilities ==> jake repack
  5. Minify JS and CSS files ==> jake minify
  6. Optionally, compress project files into a tarball or zip file  ==> jake package

Now some of these tasks depend on previous tasks so I shouldn’t be able to run them unless the previous tasks have been completed. But if they have been completed, I don’t want to rerun them. This is what buildmasters call <em>build dependencies</em>.

There is a task I haven’t yet specified, <code> jake build </code> which depends on tasks 1-6. I will show you an example build task later in the tutorial. Now let’s go back to creating basic tasks.

First Steps with Jake

Next, let’s set up jake. Narwhal has a package manager called tusk, which is comparable to ruby’s gem and Python’s easy_install.

$ tusk install jake
you@computer$ jake
No Jakefile found (looking for: jakefile, Jakefile, jakefile.js, Jakefile.js, jakefile.j, Jakefile.j)

Jake, like its siblings Rake and Make, requires a Jakefile that contains jake tasks.

Here is a very simple Jakefile

//import the jake module
//This is equivalent to python's "import" statement
var  JAKE = require("jake");
// JAKE.task('taskname', [ dependencies ], function(){});
JAKE.task('hello', function(){
      print('hello world');
});

Like Rakefiles, Jakefiles contain pure JavaScript. You should see a number of commands that are specific to narwhal. It is beyond the scope of this tutorial to cover those. I recommend you take a look at the narwhal documentation here.

To execute this simple hello task, run the following in the same directory as the Jakefile

$ jake hello
hello

Now let’s do something more interesting. I frequently need to regenerate the documentation for karma.js using a long shell command that I can never remember all the switches for. I use the excellent jsdoc-toolkit.

JAKE.task('docs', function(){
        var path = './tools/jsdoc-toolkit';
         if(FILE.exists(path)){
             var cmd = 'java -jar ' + path + '/jsrun.jar ' +
                 path + '/app/run.js ' + './js/karma.js -d=docs/ ' +
                 '-t=tools/jsdoc-toolkit/templates/jsdoc/';
             OS.system(cmd);
         } else {
             print("The folder ./tools/jsdoc-toolkit isn't present " +
                   "you need it to generate documentation");
         }

});

May prefer passing an array to OS.system rather than a string.

var cmd = [
   'java', '-jar', path + '/jsrun.jar',
   path + '/app/run.js', './js/karma.js',
   '-d=docs/', '-t=tools/jsdoc-toolkit/templates/jsdoc/'
];
OS.system(cmd);

One task that I run quite quickly is “jake clean” which I use to get rid all the temporary files created by text editors. Importing the submodule jake/clean automatically adds the “clean” task to your Jakefile. The next step is to add regular expressions that I want cleaned. The syntax for regular expressions here is not what I am used to. If may look odd to you too.

var CLEAN_LIB = require('jake/clean');  //adds the tasks clean and clobber
var CLEAN = CLEAN_LIB.CLEAN;
//include the temporary files created by text editors
CLEAN.include('**/#*#', '\.#*' , '**/\.tmp*',"**/\.*\.*\.swp");
CLEAN.exclude('\.git');    //don't touch my .git directory!

The regular expressions in the CLEAN.include() statement may look odd and that is because they are not regular expressions at all. Rather they are glob expressions.

Now, let’s run the clean task

$ jake clean

Here I tell the clobber task to delete my entire build-dir/ directory

var CLOBBER = CLEAN_LIB.CLOBBER;
CLOBBER.include('**/build-dir');
CLOBBER.exclude('\.git');

Often during a build process you find yourself checking if a particular file or directory exists and creating it if it doesn’t. Jake’s filedir() method is great shorthand for this. JAKE.filedir() which runs the task’s action if a) the target file (passed as the task name) doesn’t exist, or b) any of the dependencies’ timestamps are newer than the target’s timestamp.

filedir ("build-dir", ["debug", "release"], function()
{
    FILE.mkdirs("build-dir");
});

Now let’s go back to the 6 build tasks I outlined earlier in this article. Let’s create the build meta-task. We can specify dependencies for the build task as an array for the second argument to Jake.task. The dependencies will be run before the the build task if they are not up-to-date.

JAKE.task('build',['checkout', 'build-dir', 'move-common-files', 'repack', 'minify', 'package'],  function()
{
    /* do any finishing touches */
});

I have just scratched the surface of what Jake can do. You may want to look through my Jakefile for ideas. Cappuccino’s Jakefile is also a great example of what can be done with Jake.

Jake is a great tool and narwhal is a very useful platform. While quite young, narwhal is quite a stable and feature-rich platform. The biggest drawback that I have found working with narwhal is that documentation is quite lacking. Hopefully this will be resolved shortly.

Getting Started with Narwhal, a Standard Library for JavaScript

Filed under: News — Tags: , , , , , — bryanwb @ 2:38 am

I have been writing system administration scripts for a couple of years now, first with just regular Bash and later Python. In terms of bash scripting, I have to admit that while my invocations of my favorite tools, such as sed and find, have become more complicated my use of shell scripting programming statements has remained pretty basic. I don’t write shell scripts on a daily basis so in the weeks between writing scripts I manage to re-forget how to write a proper for loop and how to use getopts.

Sadly, this same applies to Python as I am no longer programming in Python on a regular basis. My old setup.py scripts are starting to look unfamiliar. Like a large and growing portion of web developers out there, I spend more than 90% of my time writing JavaScript and the other 10% a mix of PHP, Java, ruby, Python, etc. About 6 months ago I discovered the CommonJS project which seeks to create a standard library for JavaScript and Narwhal implementation of that developing library. There are many great uses of narwhal but my current favorite is the jake tool, which is clone of ruby’s popular rake tool. I have been using it for the repetitive tasks in the Karma project like generating documentation, cleaning up temporary files, and checking out the latest version and packaging it for deployment. I will cover Jake in my next tutorial.

“But JavaScript is a toy language!” you declare. “It isn’t meant for serious stuff like system administration.” Let me break it to you softly, by historical accident JavaScript may now be the most popular programming language and boasts some of the fastest run-times for a dynamic language. It isn’t any less-suited to utility scripting than its more august cousins Ruby and Python.

Setting up narwhal

Download and extract the http://github.com/280north/narwhal/zipball/master or http://github.com/280north/narwhal/tarball/master archive, or

$ git clone git://github.com/280north/narwhal.git

You should append the following text to your .bashrc file and then open a new terminal

export PATH=$PATH:~/narwhal/bin

Run “narwhal” or “js” (they are equivalent).

You need the java5 or java6 JDK to run narwhal which by default runs on top of Rhino, a JavaScript implemented on the Java JVM. Narwhal doesn’t play well with OpenJDK, so we need to get the JDK from sun. Below are instructions for getting Sun’s JDK and setting it up on Ubuntu Linux.

First add these lines to your /etc/apt/sources.list

deb http://us.archive.ubuntu.com/ubuntu/ jaunty multiverse
deb http://us.archive.ubuntu.com/ubuntu/ jaunty-updates multiverse

Then run

$ sudo aptitude update
$ sudo aptitude install sun-java6-jdk     # alternately, sun-java5-jdk

You may want to remove the extra lines from your sources.list after you have finished installing the package.

Next you may need to tell Ubuntu explicitly to use Sun’s JDK

$ sudo update-alternatives —config java

# There are at least 2 alternatives which provide `java’. 

Selection Alternative 

+ * 1 /usr/lib/jvm/java-6-openjdk/jre/bin/java 
2 /usr/lib/jvm/java-1.5.0-sun/jre/bin/java 

Press enter to keep the default[*], or type selection number:
# Choose #2

To test your install just run narwhal from the command line

you@computer:/$ narwhal
Rhino 1.7 release 3 PRERELEASE 2009 12 12
js> print("hello")
hello
js>

We can run our little “Hello World” as a script

// hello.js
print('hello world');


$ narwhal hello.js
hello

Narwhal has a number of command line options which you can list with narwhal --help

A Note on Narwhal Engines
Narwhal is a standard library for JavaScript, that can run on several different JavaScript implementations. So far it runs on top of Rhino, google’s V8, and Webkit’s JavaScriptCore. I believe that there are plans to run on top of the awesome node.js in the near future. You may find a Rhino a bit slow for your tastes but don’t let that put you off of Narwhal.

If you are using a Mac you can easily install the JavaScriptCore engine which is part of Webkit. It is approximately 10 times faster than rhino. I have not yet gotten it running successfully on linux. Narwhal has a package manager called tusk, which is comparable to ruby’s gem and Python’s easy_install.

$ tusk install narwhal-jsc
$ cd packages/narwhal-jsc
$ make
 # or "make webkit" if you want to use the jsc context from a webkit instance, 
# and thus have access to the DOM and other APIs
 

From here on, you can run narwhal-jsc by simply running “narwhal-jsc” or you can make it your default engine for narwhal by adding NARWHAL_ENGINE=jsc in your .bashrc or whatever file you use to control your bash shell settings.

That’s it for now, stay tuned for a tutorial on Jake, a rake clone. If you aren’t familiar with make or rake, they are excellent tools for automating repetitive administration tasks.

January 12, 2010

Creating a Scoreboard Widget with jQuery UI

Filed under: News — bryanwb @ 1:30 pm

I really, really hope that OLE Nepal can move from developing its content in Adobe Flash to JavaScript and HTML5. As I explained to someone recently, this depends entirely on how easy we can make it to quickly stick together a lesson from flexible building blocks. The basic building blocks are user interface widgets. Since Karma only uses openweb technologies, those widgets can only be created using some combination of html5, javascript, and CSS.

I have no desire to create my own UI widget framework when a number of good ones already exist. But which framework to choose? There is extjs, dojox, cappuccino, sproutcore, jQuery UI, and others. I wanted a flexible toolkit that could be used in pieces and would have a very low learning curve. This disqualified cappuccino and Sproutcore because those frameworks are both very powerful and very different from other popular web development tools and paradigms.

I settled on jQuery UI for a number of reasons:

  1. It is very simple to create your own plugin
  2. It works with CSS and html, not against them
  3. There seems to be a lot of momentum behind jQuery UI
  4. Themeroller.com rocks
  5. A number of core developers have backgrounds in graphic design

I really like that actual graphic designers develop jQuery UI. That means that design issues and usability are the forefront.

Enough technology strategy, let’s get to the tutorial.

Om, myself, Roshan, and Vaibhaw sat down some days ago and created a custom theme for OLE Nepal’s lessons. This included things such as:

  • border thickness and color
  • default font and font-size
  • what buttons should look like when they have the focus, hover, are active
  • The drop shadow thickness and orientation
  • and a whole lot more

I highly recommend you take a look at themeroller.com. If you use the CSS classes in the jQuery UI CSS framework in your application, you get a consistent theme with very little work. A great benefit is that you can change your theme later without having to change your application code at all.

Then I downloaded the theme and renamed the main theme file ui.theme.css to karma.css

To add the theme to your application, add the following inside the <head> element of your html

<link rel="stylesheet" type="text/css" href="../../css/ui.core.css" />
<link type="text/css" rel="stylesheet" href="../../css/karma.css" />

The widget we needed most urgently was a scoreboard widget for displaying the user’s score in a game a place to stick game control buttons like “Play Again”, “Start”, and “Stop”. Between Vaibhaw, roxan, and myself we keep creating different scoreboards when one common widget will usually suffice. We decided we need a scoreboard that could be laid out vertically or horizontally as needed. We also wanted a simple set of functions for incrementing the score, decrementing, resetting it, etc.

I spent about two days writing the scoreboard widget, which wasn’t too bad considering that this was my first jQuery plugin and the end result works with our themeroller theme. Some other time, I will go into the details of how I created the widget, perhaps after I create a couple more.

To add the scoreboard to your application, you first have to include a number of files. Notice that you have to add ui.scoreboard.css and ui.scoreboard.js

        <link type="text/css" rel="stylesheet" href="../../css/ui.scoreboard.css" />
	<script type="text/javascript" src="../../js/jquery-1.3.2.js"></script>
	<script type="text/javascript" src="../../js/ui.core.js"></script>
	<script type="text/javascript" src="../../js/ui.scoreboard.js"></script>

You have to have an empty <div> element in your html to hold the scoreboard

    <div id='scoreArea'><div>

After including all these library files, it takes only one line of JavaScript to make the scoreboard appear on your page.

  $('#scoreArea').scoreboard();

The scoreboard defaults to a horizontal layout as you can see below

Laying out the scoreboard only requires one additional parameter

  $('#scoreArea').scoreboard({layout:'vertical});

You can override the defaults by passing in new values to the scoreboard constructor

$('#scoreArea').scoreboard({
     layout: 'vertical',
     winningScore: 6,
     score: 0
});

Any options you specify in the hash will override the default values; any options you don’t specify will use the default values. After you have initialized a plugin, you can change any option at any time using the option method:

$('#my-elem').scoreboard('option', 'winningScore', 8);

scoreboard currently has the following public methods

setScore(x)
setTotal(x)
getScore()
getTotal()
reset()
inc([val])     //increments score, defaults to 1 unless a value val is passed
dec([val])     //increments score, defaults to 1 unless a value val is passed
incTotal([val])
decTotal([val])

$('#scoreArea').scoreboard('getScore');  //invokes the getScore method
$('#scoreArea').scoreboard('setScore', 5);  //invokes setScore method with the argument 5

One really option of using jQuery, is that I can effortlessly issue custom events.

Usually a lesson has code like this to determine if the game has been won

function questionAnswered(answer) {
   if( answer === correctAnswer){
      //reward user

      if ( totalCorrect === winningScore ) {
            /* stop game and reward user */
     }
   } else {
       /* inform user their answer was wrong */

  }
};

The scoreboard emits a custom event ‘winGame’ when the winning score is reached. Rather than using an if statement to check if the winning score has been reached I can listen for the ‘winGame’ event using jQuery’s bind method. The benefit of doing this is that repeatable logic lives in the widget and the lesson code can listen for events to control the game rather than run a CPU-intensive game loop

Here is the super-easy code in the widget for emitting the ‘winGame’ event

//ui.scoreboard.js
 if(winningScore === currentScore){
			  this.element.trigger('winGame');
		      }

and here is the code for listening for the even

//lesson.js
 $('#scoreArea').bind('winGame', 
		function(){
		    /* reward user */
		});  

After scoreboard, I need to create widgets for help, simple tests, a Nepali typepad. I also need to figure out how to document these with jsdoc and how best to unit test them.

December 20, 2009

Karma version 0.2 Released

Filed under: News — Tags: , , , — bryanwb @ 4:23 pm

We are proud to release Karma version 0.2 today. You can test out the demos here. You need Firefox 3.5 or Google Chrome/Chromium to run the demo. You can download the Karma-2.xo bundle here. We now have a well-documented API and a four part tutorial.

The Karma Project aims to create high-quality open-source educational software using openweb technologies, with special emphasis on the Sugar desktop educational environment. karma.js is a javascript library for manipulating HTML 5 and SVG in any context.


New Features:

Features that didn’t make it into Release 0.2:

  • Internationalization mechanism for inline text
  • new browsing layout (Chakra)

I am particularly proud of the Karma version of “Conozco a Uruguay”. You can try it out online right away.

If you are interested in Karma, the first step is to join our Google Group and to look through our four-part tutorial series.

  1. Introduction to karma.js
  2. Comparing HTML 5 Canvas and SVG
  3. Digging into Inkscape
  4. JavaScript and SVG

OLE Nepal and SugarLabs deserve special thanks for their continued support of the Karma Project.

December 17, 2009

Tutorial IV: The Adventure Continues – JavaScript and SVG

Filed under: News — Tags: , , , , — bryanwb @ 7:08 pm

This article is the fourth in a series of four

  1. Introduction to karma.js
  2. This article,Comparing HTML 5 Canvas and SVG
  3. Digging into Inkscape
  4. This article, JavaScript and SVG

Section II: Writing the HTML . . . 5!

Step 1: It’s all about the !DOCTYPE

It all starts with the doctype, please make sure document starts with the following doctype declaration

<!DOCTYPE html>

DO NOT USE the following

<!DOCTYPE HTML PUBLIC "-//W3C//DTD HTML 4.01//EN"
     "http://www.w3.org/TR/html4/strict.dtd"> 

Karma will throw a big fat ugly error message and be otherwise unkind

Step 2: Put the JavaScript in

    <script type="text/javascript" src="../../js/jquery-1.3.2.min.js"></script>
    <script type="text/javascript" src="../../js/karma.js"></script>
    <script type="text/javascript" src="../../js/jquery.svg.js"></script>
    <script type="text/javascript" src="../../js/jquery.svgdom.js"></script>
    <!-- Put your code in lesson.js, please -->
    <script type="text/javascript" src="js/lesson.js"></script>

Step 3: You should <object>

Please use <object> tag to embed your SVG into the HTML

Step 4: Don’t put style information into the document, put it in lesson.css

Please don’t do the following

<div id="badDiv" style="display:inline;font-size:bigger;"> Karma Rulez! </div>

The “Karma Rulez!” part is excusable but please don’t use the
style attribute. It is not only bad practice but it
will totally screw up the as-yet-unwritten internationalization
library mundo.js

Section III: The Presentation Layer with CSS

Good News, you can use the same CSS file for both your html and SVG
To use an external css file in your SVG, you need to link it in just above the first <svg> tag.

<?xml version="1.0" encoding="UTF-8" standalone="no"?>
<?xml-stylesheet href="../../css/lesson.css" type="text/css"?>
<svg ......

We want to make sure that the text on the map and the spaceship are invisible. Let’s also make the cursor become a pointer when it moves over a capital icon.

.text { display: none; }
.capital.city { cursor: pointer;}
.spaceship { display: none;}

Much of our program logic will be to reveal elements of the map and the spaceship when the user answers correctly.

CSS is a complicated, tricky beast that I can’t begin to explain here. Let’s move onto something easy, like JavaScript!

Section IV: Writing the game logic with JavaScript

Step 1: Meet jQuery, jQuery meet you

jQuery is a fantastic library for interacting with the HTML Document
Object Model or DOM. What is this &^&$$! DOM? The DOM is the
programming interface for HTML in the browser. Working with it
directly is pretty painful but jQuery abstracts it to something that
is actually quite pleasant to work with. We start with jQuery using the following:

$(document).ready(
    function(){
        //Once the HTML on this page has fully loaded,
	// run my code here
        
    }
);

$(document).ready doesn’t mean that everything is ready. It only means that all the html and <img> elements have finished downloading. It does not mean than any <audio>, <video>, or <svg> elements have finished downloading. This is important as your program will fail if it tries to manipulate any of these elements before they are ready.

Step 2: Tell Karma about your assets and Karma will put them into collections

	var k = Karma({
			  svg :[    
                              {name:'capitals', domId: 'capitals'},
			      {name:'alien', domId: 'alien'},
			      {name:'spaceship', domId: 'spaceship'},
			      {name: 'help', domId: 'helpScreen'},
			      {name:'playAgain', domId:'playAgain'},
			      {name:'helpIcon', domId:'helpIcon'},
			      {name:'quitIcon', domId:'quitIcon'}
			  ],
			  audio:[
			      {name:'correct', file:'correct.ogg'},
			      {name:'incorrect', file:'incorrect.ogg'}
			  ]
	});

The Karma() method initializes Karma.karma object with assets we pass
to it. During this initialization, the svg array we pass in is
converted to the “collection” object k.svg. You can access any of the values k.svg
using the name you passed in as the key. The ‘name’ property is arbitrary. I use this instead of the filename or domID because those can often be lengthy.

var mySvg = k.svg.helpIcon  //same as <svg id="helpIcon">
var myHeight = k.svg.helpIcon.height;
var myWidth = k.svg.helpIcon.width;

var name = 'playAgain';
var mySvg2 = k.svg[name];  //you can reference different assets programmatically

//You can even loop through the entire collection, but remember a collection
//is an object and not an array
$.each(k.svg, function(mySvg){ mySvg.css('display', 'none');

Accessing these items using the collections has an optional
performance benefit. Every time you use a css selector such as
document.getElementByid(‘someId’) or $(‘#someId’), you run a search
through the entire DOM.

Karma currently supports five different collection types, k.audio,
k.canvas, k.svg, and k.video. Please note that the prefix ‘k’ is an
arbitratry shortcut to Karma.karma and not by default part of the
global scope.

Karma will also throw errors if any of these assets can’t be
loaded. You will probably find this very helpfulin debugging your
application. Karma() also attaches helper methods and properties.

You do not have to tell Karma about all the images, svg images, and audio files in your application. You only need to tell Karma about the ones you want to helper methods for and to be fully loaded when you call Karma.ready()

Step 2: Get Ready!

Most likely, you won’t want to start our program until all of our assets are ready. $(document).ready only makes sure that the HTML and images have loaded. For this reason, Karma provides Karma.ready(), which blocks your program from running until all the assets you told it about in Karma( ) have fully loaded.

$(document).ready(
    function(){
	var k =	Karma({ /* tell Karma about your assets */});
	
	k.ready(function (){

        //Once the HTML on this page has fully loaded,
	// run my code here
	}        
    }
);

You have to wrap your code in function () { } otherwise it will
execute immediately, without waiting for Karma to be ready().

Step 3: Attach Event Handlers to the capitals on the map


 $.map($('.capital.city', capRoot), function(elem){
		$(elem, capRoot).bind('click', function(event) {
                        if (isActive){
		             checkAnswer(event.target);
                        } else {
                               return;
                        }
	       });
}); 
// $('.capital.city', capRoot)  is a CSS selector that matches every city icon on the map
// $.map( )  executes the anonymous function on each matching item
// .bind() is a jQuery method that attaches an Event Listener
// isActive is a global variable, when the game is paused, it is false
// When the game is paused rather than removing the event handler, simply set isActive to false

Step 4: Make the alien talk

This is easy, use jQuery’s text() method to change the text

The CSS selector ‘foreignObject #alienQuestion’ matches an element with the id alienQuestion preceded by a foreignObject tag. For some reason it doesn’t work without including foreignObject in the selector. Perhaps this is a quirk having to do with using the foreignObject tag.

 $('foreignObject #alienQuestion', k.svg.alien.root).text('some Text');

Step 5: When user makes correct choice, display text and reveal part of the spaceship

//complex command that splits out a part name from those not yet displayed
var part = parts.splice(0,1)[0];  

//previously display for these items was set to 'none', 'block' makes them visible again
$('#' + part, spaceshipRoot).css('display', 'block');
$('foreignObject #alienQuestion', k.svg.alien.root).text("Correct! " + question.capitalName               
    +  " is the capital of " + question.deptName);
//display the text of State and capital 
$('.text.' + question.dept, capRoot).css('display', "block");

Step 6: Make the spaceship fly away

	    var flyAway = function(){
		var isLaunching = true;
          
		var startEngines = function(){
		var shipFire1 = $('#shipFire1', spaceshipRoot);
		var shipFire2 = $('#shipFire2', spaceshipRoot);
		var toggle = true;		    
		    
	   //this animation alternates the display of two images
           //to simulate rocket propulsion
	    var toggleFires = function(){			
			if(isLaunching){
			    if(toggle){
				shipFire1.css('display', "none");
				shipFire2.css('display', "block");
			    }else{
				shipFire1.css('display', "block");
				shipFire2.css('display', "none");
			    }
			    //toggle fires
			    toggle = !toggle;
			    setTimeout(toggleFires, 400);
			}
		    };

		    toggleFires();	     
		};

		
		var fly =  function(){
		    $('#spaceship').animate({"bottom":"550px"}, 
			    {"duration":8000, 
			    "complete": function(){ 
				isLaunching = false;
				showPlayAgain();
			    }});
		};

		var blastOff = function(){
		    startEngines();
		    setTimeout(fly, 2000);				   
		};

		blastOff();
		
		
	    };

Step 7: Dialog Boxes

This part is actually quite easy

A ‘dialog box’ is nothing more than an absolutely positioned <div>

The following code takes a div element that previously hidden and centers it in front of everything else in the screen using the ‘z-index’ property

$('#helpScreen').css({"position": "absolute",
				"width": "420px", "height": "360px",
				'top': '25px', 'left': '20%',
				'z-index' : 20,  'display':'block', "opacity": 1});

For further exploration, I highly recommend reading through the original source code.
I haven’t explained every part of this exercise in detail so please leave me comments with what you don’t understand or think should be explained in greater detail.

Tutorial III: Digging into Inkscape

Filed under: News — Tags: , , , , — bryanwb @ 5:10 pm

This article is the third in a series of four

  1. Introduction to karma.js
  2. Comparing HTML 5 Canvas and SVG
  3. This article, Digging into Inkscape
  4. JavaScript and SVG

In the previous two tutorials I introduced you to the karma.js library and to working with HTML 5 <canvas> and <svg>. In this tutorial, I will walk you through creating a geography lesson from scratch using Inkscape. Tutorial #4 will cover manipulating our SVG graphics using JavaScript

This lesson will teach how user the location of the different
states of the country Uruguay.

I confess, I did not create this lesson from scratch. The excellent original “Conozco a Uruguay” (I know Uruguay) was created by Gabriel Eirea and his friends at CeibalJam!, a grassroots organization developing educational software for Uruguay’s nationwide OLPC
implementation. The original version of Conozco a Uruguay was written entirely in Python, using the excellent pygame library, a python wrapper around the animation library SDL. Why rewrite it using HTML5 and JavaScript? The reasoning is simple. CeibalJam! spends a lot of its time teaching Uruguayan volunteers how to write educational software using Python. At the same time, there are a large number of web developers in Uruguay who could start developing with Karma with only minimal training. This situtation holds true for Nepal as well. We spend a lot of our time teaching developers how to program in flash when there are lots of local developers who already know HTML and JavaScript.

The Plot

A poor alien has crash-landed on earth. The pieces of his spaceship have scattered across Uruguay. The user must help him locate the correct state where individual pieces are located. Once all the parts are found, the friendly alien can fly home.

Before we go any further please play the game at least once. You can browse all the source code for this example here.

How we are going to do it

We will have three main graphical elements, a political map of Uruguay, a spaceship, and an alien that asks the user questions. We will use SVG images for all three. The main action through out this application will be alternately showing and hiding text that happens to be superimposed on graphical images. SVG particularly shines in
this use case.

Section 1: Digging into Inkscape

In creating the Karma version of Conozco, I cheated. I didn’t create all the graphics from hand. In fact I didn’t draw a single one of them. I converted the original .png images to .svg using inkscape’s Trace Bitmap feature. I added a few images such as the help and exit icons. Those are GNOME icons that I copied.

You may find this section frustrating if you have never used inkscape before. I highly recommend you run throught the Inkscape Basic tutorial. You can find it through the Help menu in inkscape. Help > Tutorials > Inkscape:Basic

Step 1: Convert the map

File > Import
Choose the image in folder tutorial3/mapStates.png

Path > Trace Bitmap

Select Edge Detection and then click OK

Tracing the Bitmap

Tracing out the map

The Trace Bitmap dialog doesn’t close automatically so just click the X in the upper right corner.

Now click on your image and drag it to the right. You have two maps! The one on top is the SVG version. The one below is the old png. Delete the one below it.

maps superimposed

The one below is png and the one on top SVG

You may find that the white rectangle does not line up with your map. You can fix this with File > Document Properties then click the button “Fit Page to Selection.”

fit page to selection

Fit the page to the map

Step 2: Create the Capitals and the States

The great thing about SVG is that you don’t have to remember any x,y coordinates. Just put something on the map, set the element ID, and you can always access it later using a CSS selector statement.

Let’s create the marker for the state capitals

Click the button with the circle icon in the left vertical tool bar, then create a little circle

Next, right click on your circle and choose the option “Fill and Stroke”

At the fill tab, set all values to 255, to fill the circle with white

Set the color for the fill

Then go to the “Stroke paint” tab, make the R, G, and B values 0, 0, 0

Set the color for the Stroke/Outline

Now drag your little capital into place on the map.

Drag onto map

Click the “Text” icon on the left vertical toolbar. We are going to create two <text> fields, one for the state and one for the state capital. Make sure the font size isn’t too big for the area you highlighted

Create the text elements

Step 3: Add element ids and class names to the states and capital cities

Click on the icon you created for the capital, then click on the icon “Edit XML Tree” in the upper menu bar.

Edit the XML Tree manually

Highlight the “id” attribute in the upper right box. Then type in a new id in the bottom blank area. MAKE SURE YOU CLICK SET otherwise your change will not stick.

Set the id to “cap” + yourCapitalName

Set the element id

Now we are going to create a new attribute “class”

Go to the box where there currently is id and type “class” in its place. For the value, type in:


capital city yourCapitalName yourStateName

make sure you click SET!

Type in class names


Repeat the above for your capital icons

Set the id’s for all the capital text areas with “text” + CapitalName
and the id’s for the States with “textDept” + YourStateName. Using
these prefixes and camelCase consistently will save your tuckus later.

For each state text area, add the following class names

text dept yourStateName yourCapitalName

For each capital text area, add the following class names

text capital yourCapitalName

You may notice that I use “dept” frequently. That is because Uruguay calls their states “departamentos.” It was easier for me to continue using their convention rather than using “state.”

I can’t overstate the importance of setting the id and class properties correctly and to do it consistently.

Using these properties I can do operations such as the following

//hide all text on the map
$('.text', k.svg.capitals.root).css('display', 'none');

//show the text only for yourState and yourCapital
$('.text.yourStateName', k.svg.capitals.root).css('display', 'block');

Wow! Them css selectors aRrrre powerful stuff!

Step 4: Put it into the directory assets/svg

If you haven’t created a project folder yet, now is a good time. Here is a good template

mykarma/
        assets/
               audio/
               svg/
        css/
        js/

Step 5: Convert the alien

File > Import choose alien.png

Path > Trace Bitmap…

Go to the area “Multiple Scans: create groups of paths” and select the option “Colors”

Next Click OK.

Trace the Colors

Delete the image underneath as you did before.

Delete the Image Below

Step 6: Create the Word Bubble

Click the button “Create Rectangles and Squares” and drag out a nice big rectangle

Create the Word Bubble

Give the rectangle nice rounded corners, set the values in the Rx and Ry boxes to 50

Round the corners

If you can’t see the Rx and Ry boxes, click the “Create Rectangles and Square” box again

Click on Text in the left vertical icon bar and type some text in the word bubble area. Make text area as big as the word bubble.

Create the Text Area

Go to File > Document Properties and click “Fit Page to Selection”

Fit the page to your image

Save your SVG as alien.svg and close Inkscape

Step 7: Text Don’T Wrap in SVG! A Beautiful Hack

In previous, tutorial I explained that inkscape does not support word wrapping in <text> elements. Let’s put into practice the hack I discussed last time.

Open up alien.svg in a text editor

Go to the portion of your file with the text in it. If it is
surrounded with <flowPara> tag, it should be fine. Leave it as
it is. If it is in a <text> element, delete the entire <text> element and replace it with the following:

 <text>
 <foreignObject
     id="textHack">
    <xhtml:body>
      <xhtml:div
         id="alienQuestion"
         style="font-size:20px"></xhtml:div>
    </xhtml:body>
  </foreignObject>
  </text>

Step 8: Convert the spaceship

There may be a much easier way to do this. If you know of one, please leave a comment.
Import ship.png

Path > Trace Bitmap

Select Multiple Scan, Grays and click OK

Multiple Scans with Grayscale


Drag out your grayscale version of the rocket

In the left vertical bar, click paint bucket

Select the red color from the lower color bar

Pick a color

dump paint into the left wing in the grayscale image, then drag it away

Paint the Wing

Drag out the wing

repeat for the rest of the space ship to reassemble your ship

Delete the original image and the grayscale

Highlight each individual piece of the ship then choose “Edit the XML tree” and set the id

Set the Id on the left wing

There are other SVG images in the Karma version of Conozco a Uruguay but there is nothing more advanced in them than what we have covered so far. Whatever you do, please put all the your SVG elements into the folder assets/svg/

Next up is manipulating SVG using JavaScript.
Older Posts »

Create a free website or blog at WordPress.com.