I have created a simple template for individual karma lessons. In this post, I will explain how to use the template and what still needs to be implemented. The template still has some rough spots that I would very much appreciate feedback on.
Before reading on, you should download the lesson template directly or use git to clone the repository.
$ git clone git://git.sugarlabs.org/karma-lesson/mainline.git
What the Template Provides
- Layout that matches the XO’s screen resolution
- Navigation bar – with links to help text, lesson plan, and teacher’s note
- Viewer for lesson plan and teacher’s note
- Scoreboard, timer, Start, Stop, Restart buttons all in the footer
- Helpers to make your lesson event-driven rather than using a single control loop
- Basic i18n for strings, but this is still in flux
Most Important Files in the Template
These are the files that will modify to create your lesson
- index.html – the markup for your lesson
- js/lesson.js – the code for your lesson
- css/lesson.css – the layout for your lesson
Meet index.html
The html markup in index.html is quite simple
<body>
        <div id="kHeader">
        </div>

	<!-- Put the help text inside #kHelp -->
	<div id="kHelp" title="Help Title"> Help text here</div>
	<div id="feedback"></div>
	<!-- #kMain is where the magic happens, the main frame where your lesson
              its stuff -->
	<div id="kMain">
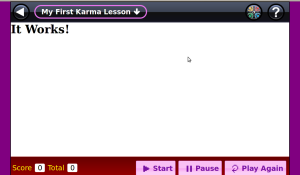
	  <strong id="itWorks">It Works!</strong>
	</div>
	<div id="kFooter">
	</div>
</body>
That is very little html for actual page that is rendered. That is because #kHeader, #feedback, and kFooter are just scaffolding that we use to hang jQuery UI widgets on.
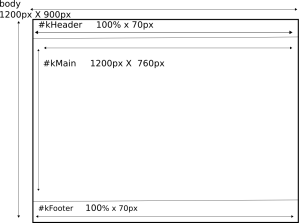
Here is a wireframe of index.html that will help you understand the dimensions and layout

As you can see from the wireframe, the lesson has a default width of 1200px and height of 900px. This gives you 1200px X 760px in #kMain to use for your lesson.
This is to match the dimensions of the XO. We could default to a smaller resolution that matches most desktops, like 1024 x 760 or 800×600 and scale up the lesson on the XO. We don’t do this for two reasons. First, scaling up is cpu-intensive and slow as molasses on the XO and second, scaled up raster images (.png, .jpg) ‘pixelate’ and look like crap. If we only used SVG images throughout the template, this would be a non-issue, as SVG scales up and down without performance cost.
I have created a function in the Karma.scaleWindow that will scale down the entire lesson to 950px X 760px. This leaves you only 950px X 460px. Please don’t develop a Karma lesson at this resolution if you intend it to run on the XO. I created this function to scale down your lesson to run on non-XO’s with the resolution 1024 x 760. With a bit of work you can make sure your lesson works at both 1200px X 900px. By far the easiest way to do this is to only use SVG.
Karma.scaleWindow(); /*scales window to 1024 x 760 if current browser window is narrower than 1150px */
If anyone has a better idea how to handle different screen resolutions while still accommodating the XO’s performance issues, please let me know.
Additional files that may be of special interest
- start.html
- kDoc.html
- lessonPlan.html
- teachersNote.html
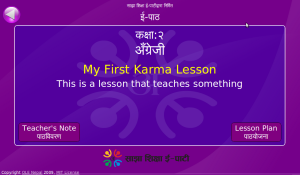
The start.html page is an introductory page to the lesson that provides big obvious links to the Lesson Plan and Teacher’s Note. It also indicates very clearly which grade and academic subject the lesson is for. The Lesson Plan describes how to lead the children through the lesson in a classroom. The Teacher’s Note explains what the purpose of the lesson is and where it fits into the curriculum. index.html also has quick links to the Lesson Plan and Teacher’s Note but they are harder to find. The start page may seem unnecessary to some, but the teachers in Nepal tell us that they like it.
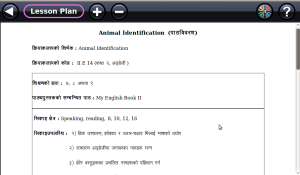
I have created a simple viewer kDoc.html for viewing the lesson plan and teacher’s note.
I cannot understate the importance of the lesson plan and teacher’s note. Figuring out how to use educational software effectively with 30+ energetic kids is not a trivial task.
Widgets
Remember the minimalist markup for kHeader, kFooter, feedback. All three are jQuery UI widgets that have to be attached to HTML <div> elements.
A jQuery UI widget typically consists of a JavaScript file and a CSS file. Here are the widgets and the files that make them up:
- kHeader — js/ui.kHeader.js and css/ui.kHeader.css
- feedback — js/ui.feedback.js and css/ui.feedback.css
- kFooter — js/ui.kFooter.js and css/ui.kFooter.css
See the API documentation online or at docs/index.html in the template
Attaching a widget to a page
var $kFooter = $('#kFooter').kFooter(); //where #kFooter is a <div> element
Using different initialization parameters
var $kFooter = $('#kFooter').kFooter({'winningScore': 6, timer: true, scoreboard: false,
						pauseButton: true, startButton: true});
Notice that II assigned the result of the kFooter method to the variable $kFooter. This variable is cached reference that I can use to call new methods on the kFooter later and it is much faster than using a fresh jQuery selector each time like $('#kFooter').kFooter(/* some method */);. The naming convention for such variables is to prefix them with the ‘$’ character to signify the variable refers to a jQuery object.
All three widgets have their own methods that you can use to interact with them. The kFooter widget, for example, has methods getScore(), inc(), dec(), setScore(), startTimer(), stopTimer(), and more to manage its built-in scoreboard and timer
Calling methods on jQuery UI widgets is bit different. You pass the method name as an argument in order to call it. Here are examples of calling methods on the kFooter widget:
$('#kFooter').kFooter('inc');   //increments the score
//or if u have a reference
$kFooter.kFooter('inc');

// To pass arguments to the method, simply append them as additional arguments
$kFooter.kFooter('inc', 2);  //increment score by 2 rather than the default of 1
Event-Driven User Interface
When you create your first lesson, it is very tempting to use a loop like
while(true){

  if(/* user does X */){
       exit the loop
  }

}
This code, while well-intentioned will cause your browser to display the horrible “Unresponsive script” message. The code also makes the user interface sluggish and generally unresponsive.

You can avoid this terrible message by making your code event-driven. This is a big word for using events and flags to control the behavior of your lesson.
Here is some code that look event-driven but actually is just a modified for loop and should be avoided. It can also cause the dreaded “Unresponsive script” message.
var timerId;

var game = function(){
      /* do stuff */
      timerId = setTimeout(game, 10);
}

if(/* user wants to quit */){
     clearInterval(timerId);
}
Here is a good example of event-driven code, modified code take from ui.kFooter.js
var timerRunning = true;
var runTimer = function(){
	if (timerRunning) === false){
	    return;  /* setting timerRunning to false stops the timer */
       }
        /* code for manipulating the time displayed */

	timerId = setTimeout(runTimer, 1000);
};

//start the timer
runTimer();

//to stop the timer, set the flag timerRunning to false
timerRunning = true;
Things to Remember:
* Use setTimeout rather than setInterval
* Set flags to stop a background animation or timer rather than clearInterval()
Triggering custom Events and listening for them
If you initialize the kFooter widget with a winning score, it will emit a custom event “kFooterWinGame” event when that score is reached.
var $kFooter = $('#kFooter').kFooter({'winningScore': 6});

//show congratulations message when kFooterWinGame event is emitted
kFooter.bind('kFooterWinGame',
		function(){
		    $('#congratulationsMessage').show();
		});
The API documentation details the events that each widget emits.
Unresolved Issues
Here are some unresolved issues that I will continue working on and would most appreciated help with.
- Scaling – scaling and raster graphics (.png, .jpg files) just don’t play well together
- Icons – jQuery UI icons are all png’s, which means they scale poorly. They are also too small and hard to override
- Sound plays poorly on chromium on linux — pls up vote this issue in the chromium bug tracker to encourage the chromium guys to fix it.
- internationalization — still in flux, doesn’t integrate with pootle
- Firefox 3.6 performance is pretty sluggish on the XO. We really need to figure out how to get chromium running on the XO. I believe it will be at least 2x faster.
Internationalization is still very much in flux – I have created a basic jQuery plugin for handling it but it leaves much to be desired. I just recently discovered google chrome’s i18n mechanism for chrome extensions and I believe that it is far superior. I hope to port it to jQuery, which should take some time. I really think that chrome, jQuery, and Firefox’s jetpack should agree on a common API for i18n. Integration with pootle will be a pain but there more incentive for others to integrate with it if all three platforms used the same tooling.


